


♦♦♦ [ART] Perspective in Action: A Step-by-Step Fictional Villa... How I Paint.
No camera. No location. Just imagination and technique. Built from scratch using perspective and reflection, then painted in watercolor. Here's how, step by step.

Ever notice how convincing fantasy landscapes don't feel imagined at all? Here's the secret: even imaginary scenes require real-world connections. I’ve identified my steps, the ones I return to again and again, before brush ever hits paper. Here are two of the eight crucial steps I use when inventing fantasy watercolor scenes that just don’t exist in the real world.
Quick thumbnail sketches to explore composition variations (simple block-ins, detail not allowed).
Gathering specific reference materials that ground impossible places in visual reality. These two techniques alone, properly executed, will immediately elevate your fantasy environments. Let me walk you through a complete process for a recent watercolor I made for a demonstration. It came from my imagination, not reality.

Let’s Get Into All The Steps
Inventing a scene from scratch can be pure joy if you're an artist. But it takes knowledge and technique to get it right. Today, I'll take you through how I painted a watercolor of an Italian villa and boathouse—entirely from imagination, grounded in linear perspective and a bit of creative intuition.
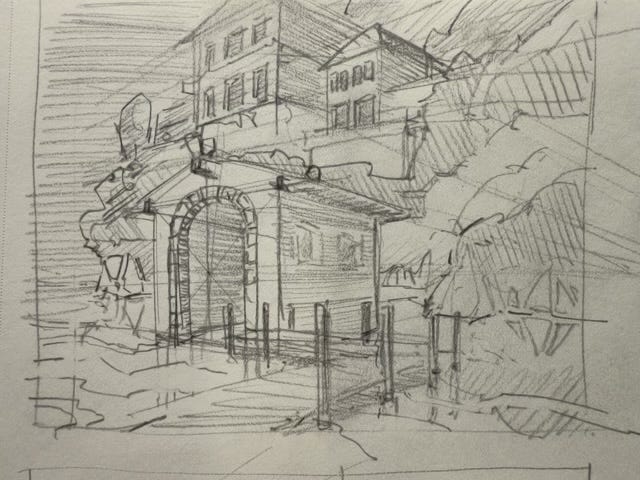
Step 1: Thumbnail Sketches
Everything starts rough. I usually sketch two or three thumbnail compositions, playing with different angles, placements, and focal points. These thumbnails aren't masterpieces; they're quick explorations to nail down where my horizon line and focal elements will be. In this case, I settled on one after only one or two quick studies. I do my thinking in thumbnails, so when the brush hits paper, I am no longer “thinking.”
Step 2: Gathering Reference Imagery
Although the final scene is imaginary, references help ground the details. Real plants, lighting, atmospheric examples, and reference architectural elements made the image coherent. Looking at real-world examples ensures my fictional scene is more believable. Specificity is key.
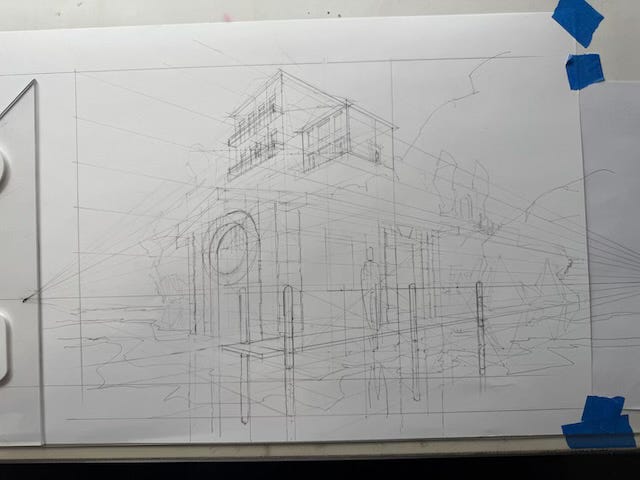
Step 3: Perspective Construction
With my rough composition nailed down, I draw out a perspective grid, starting with my horizon line and vanishing points. Because my background structures were parallel to the main boathouse, I used the same vanishing points throughout, adhering to a crucial perspective principle: parallel objects share vanishing points; non-parallel objects need their own.
Step 4: Drawing and Reflection Calculation
Next, I roughed out the curves of the boathouse's entrance and carefully calculated the reflections on the water. I mirrored the boathouse elements through the "mirror plane" of the water's surface. These precise reflections add depth and realism to the scene. Did I map out every point across the mirror plane? No. For the most dominant forms? Yes. Yes, I did—especially in the foreground.
Step 5: Tone Study
Before starting the final painting, I made a small tonal sketch—just a couple of inches wide—to plan out highlights, mid-tones, and shadows. I used a pencil to map out my tones. Atmospheric perspective is critical, reducing contrast and textural detail as elements recede into the distance to "sell" the illusion of depth.
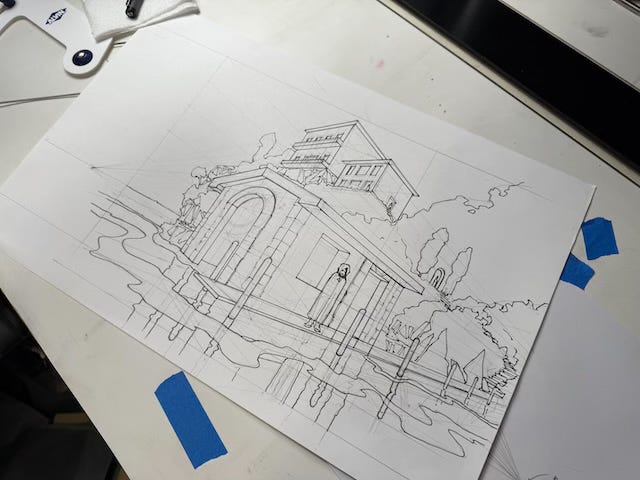
Step 6: Refining the Drawing
Now, I ink the major lines in pen. Why? Because I need to prioritize the lines. This makes tracing on the lightbox easier. I also pulled out an ellipse template to hardline the arch. Why? Because I own several complete sets of ellipse templates. You may ask, "Why didn't you do this in the first place?" It takes a lot of time to pick the right degree of ellipse and its size. But, in the final stages, well-executed, clean ellipses correctly chosen from a set of ellipse templates, make your circle in perspective unassailable. As an industrial designer, old habits die hard. Finally, white gouache comes to the rescue. I make mistakes, with more frequency than I'd like to admit, and gouache corrects them. It's critical to eliminate incorrect lines. Perspective drawings get messy quickly. Bad lines always have a way of commanding attention at the worst time— when you’re pulling that make-or-break-it stroke. When you plan to remove them but forget, the painting suffers. Remember, each stage is an opportunity, not a distraction.
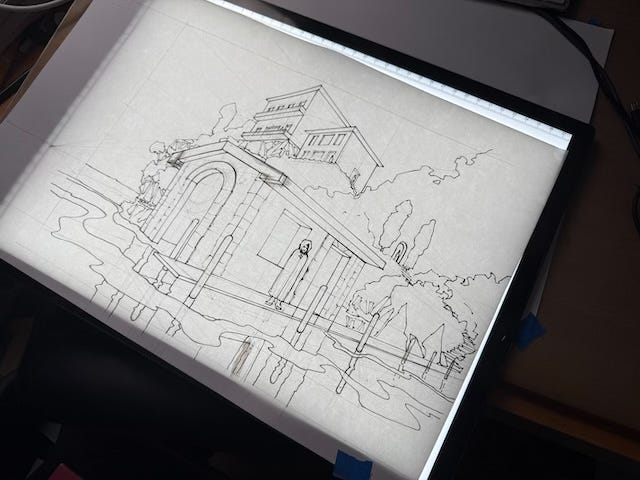
Step 7: Transferring the Drawing
The line drawing then goes onto the lightbox, taped down under a sheet of watercolor paper. I redrew the entire piece lightly by hand. Why redraw by hand instead of tracing rigid lines? It keeps the final painting organic, alive, and believable.
Step 8: Watercolor Painting
Finally, the fun part—painting! I paint my watercolors in a fluid, relaxed manner, just like when I paint from life (plein air). My organic, naturalistic approach keeps the composition's energy high and prevents artistic rigor mortis. Dead lines and static paint strokes are my anathema. When a painter is anxious about the process, their painting inevitably becomes rigid and tense.
My hero, Syd Mead, released a series of DVDs years ago through the Gnomon Workshop. His rule? Each step is necessary. Shortcuts reduce the opportunities to refine and improve your work. Decide which steps your artistic process requires, then stick with each. Skipping a step increases the chance that your painting won’t be as good as it could have been.
Wil Bigio, a good friend and skilled artist, informed me that Syd Mead has a show in Chelsea, NY, until May 20th, 2025. See his work. You’ve got only two weeks left. His artwork defined film design for a generation, probably two or three. His gouache paintings are masterpieces of visual design.
The Final Stroke
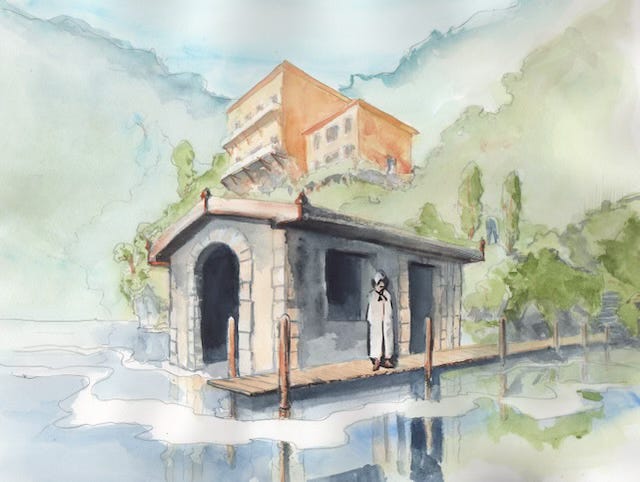
Staying loose gives the imaginary scene a dynamic, immersive feeling. My intent? To make it feel like a plein air study from direct observation. Did I pull it off?
Here's the finished painting. Do you think I maintained the energy from the initial sketches? Does this imaginary villa and boathouse feel real to you?
I'd love to hear your thoughts—let me know in the comments below!
I’m teaching two perspective workshops at the Art Students League of New York in July. Both are in the evening, so working professionals can attend. I’d love to see you.
Easy Perspective: Drawing Space and Depth
https://workshops.artstudentsleague.org/course/Houghton-WS-Easy-Perspective-Drawing-Space-and-De_cd_6506_6982
Mastering Curves and Reflections: Advanced Topics in Perspective
https://workshops.artstudentsleague.org/course/Houghton-WS-Perpective-Reflections_cd_6558_6985
Charles Merritt Houghton
8 May 2025
Key Takeaways:
Start with quick thumbnail sketches to explore composition.
Find real-world references to inform and enhance your imagined scenes.
Establish a clear horizon line and vanishing points for realistic perspective.
Remember, parallel objects share vanishing points.
Calculate reflections accurately by mirroring through a reflective surface.
Do a tonal study to plan your highlights, mid-tones, and shadows.
Keep the final lines organic by freehanding your transferred drawing rather than rigidly tracing it.
Paint loosely and expressively to maintain energy and dynamism in your final watercolor.