

From Guesswork to Precision with Simple Drawing and Perspective Exercises
Tired of your drawings being wonky or flat, even when you're sure you got the shapes right? Master basic perspective, and you'll turn your sketches from amateurish to professional with simple steps.

Linking What You See with Underlying Forms
Drawing by eye is a valuable skill, but it's the understanding of the underlying forms and perspective that truly brings your images to life. This exercise is designed to help you bridge the gap between what you see and how you construct it on the page using perspective techniques. The focus is on recognizing that many objects are collections of basic shapes, often platonic solids, and using perspective to draw them accurately. This is a crucial skill in your artistic development.
Most important is connecting the visual to the intellectual. What am I actually seeing? What simple forms can I find within the object to draw the form convincingly? It’s always easier to draw simple forms over complex ones. Find the core geometry and build off it.
The Foundations of Perspective Drawing
Before diving into the steps, let's break down some essential principles:
Platonic Solids: These fundamental shapes form the building blocks of most complex objects. They include the cube, sphere, cylinder, cone, and pyramid. Understanding these forms helps you break down complex objects into manageable pieces.
Perspective: Linear Perspective is about creating the illusion of depth on a flat surface. You want that drawing on your paper to look like something that is real or could be real. It's governed by your vantage point (where you are relative to the object) and the placement of the horizon line, which represents your eye level.
Horizon Line: This is a critical element in perspective drawing. It represents your eye level and is where all vanishing points converge. Depending on where you place it, it can change how an object looks—whether you see its top, bottom, or sides.
Vanishing Points: These are points on the horizon line where parallel lines appear to converge in perspective. In a one-point perspective, all lines converge to a single point; in a two-point perspective, they converge to two. If your head is dramatically tilted, you have to step up to a three-point perspective, and yes, your drawing gets much more complex. 3PT is rarely necessary unless your shot is about being high above or far below the focus.
Step-by-Step: From Eyeballing It to Being More Intentional and Precise
EXERCISE 1
Step 1: Draw by Eye
Objective: Start by drawing an object purely by observation.
What to Do: Choose a simple object, like a box, mug, or book, preferably something simple. Without using any tools or guidelines, draw the object as accurately as possible by looking at it. Focus on capturing the overall shape, proportions, and angles. This helps you engage with the form directly and see where your natural instincts lead you.
Step 2: Analyze Your Drawing
How did it go? Is it a convincing drawing of what you see? Did you get the surface it's sitting on? Context drives meaning, so don't neglect hints of what's around it. Don't overemphasize them, but don't have the object floating in an empty white space, either. How about the light? What direction is it coming from?
EXERCISE 2
Step 1: Analyze the Object's Form
Objective: Understand the object's structure in terms of platonic solids.
What to Do: Look at the object again and break it down into its basic shapes. For example, if it's a box, it's simply a cube; if it's a cylinder, consider the top and bottom circles with the sides connecting them. This step helps you visualize the underlying geometry of the object.
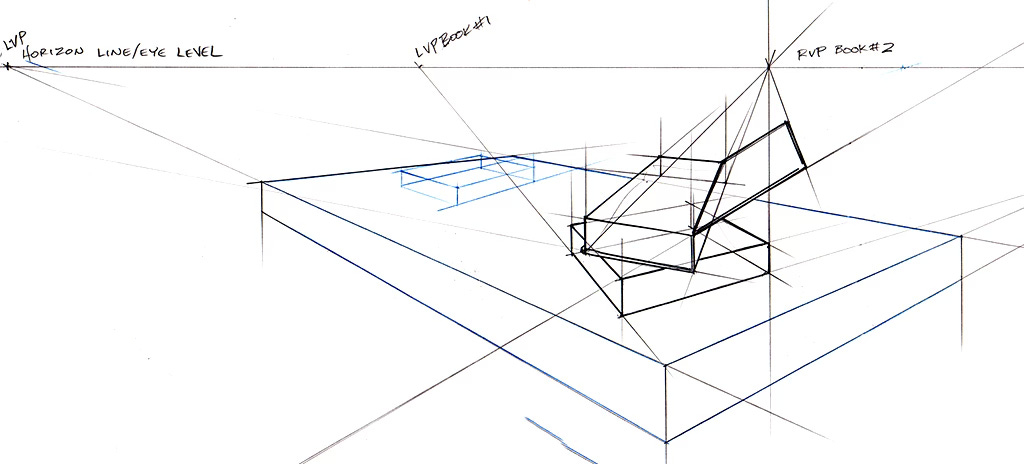
Step 2: Set Up Your Perspective
Objective: Set up the foundation for accurate perspective drawing.
What to Do:
Determine Your Vantage Point: Where are you looking at the object from? Is it below you, at eye level, or above? This determines the horizon line's placement.
Place the Horizon Line: Draw a straight line across your page at the height of your eye level relative to the object.
Identify Vanishing Points: If you're drawing in a one-point perspective, all lines recede to a single point on the horizon line. In a two-point perspective, you'll need two points—one for each set of parallel lines.
Step 3: Draw the Object in Perspective
Objective: Translate what you see into an accurate perspective drawing.
What to Do:
Draw the Surface Plane: Start by drawing the plane on which the object sits. This could be a tabletop or the ground.
Outline the Object's Footprint: Draw the object's outline where it meets the surface. Use the vanishing points to ensure all lines recede correctly.
Build Up the Form: Once the base is set, extend the lines vertically and complete the form by connecting the appropriate points, ensuring everything aligns with the perspective.
Check Your Work: Adjust the proportions and angles to match the object's real-life appearance, adjusting as necessary.
Step 4: Refine and Compare
Objective: Understand the differences between freehand and structured drawing.
What to Do: Compare your initial drawing by eye with your perspective drawing. Notice where your natural instincts were correct and where the perspective drawing brings more accuracy. Reflect on how understanding perspective changes the way you approach drawing complex forms.
Wrap-Up: The Power of Linking Vision with Structure
This exercise isn't just about getting a drawing right—it's about training your eye to see the underlying structure of everything you draw. By understanding the principles of platonic solids and perspective, you can take your sketches to the next level. Whether drawing from imagination or life, these skills will allow you to create more accurate, dynamic, and convincing forms. With practice, you'll find that you can naturally incorporate these principles into your freehand sketches, blending intuition with precision.
Further Reading and Resources
Books:
"Perspective Made Easy" by Ernest R. Norling A straightforward guide to mastering the basics of perspective, perfect for beginners and advanced artists alike. It's pretty old, but it covers the basics well.
"Drawing the Head and Figure" by Jack Hamm Offers practical advice on using basic forms and perspective to construct accurate, lifelike drawings. I love Jack Hamm's books. They're accessible and fun.
"How to Draw: Drawing and Sketching Objects and Environments from Your Imagination" by Scott Robertson Focuses on perspective techniques to create believable and dynamic forms from imagination. Scott's specialty is designing vehicles, complex curvilinear forms, and symmetrical objects.
By mastering these principles, you'll elevate your drawing skills, bringing a new level of precision and professionalism to your work.
Get on it. But remember, draw things that interest you first. But eventually you must confront those that challenge and vex you. In the long term, you must be prepared to draw anything.
Charles Merritt Houghton
24 August 2024