Understanding Bleed, Trim, and Live Area for Comic Book Pages
When creating a comic page, you must understand three critical areas: bleed, trim, and live area. No shortcut. You must understand these terms. Don't, and your print job risks going horribly wrong.
As comic creators, working within the correct dimensions is essential for a professional finish. When creating a comic page, you must understand three critical areas: bleed, trim, and live area. In this article, I explain these terms and show you how to effectively use them on your comic paper. I also cover a convenient shorthand that we use in class, which will help you avoid common mistakes during layout and printing. Wanna find out? Read on.
The Three Key Areas of a Comic Page
1. Bleed
• What is it?
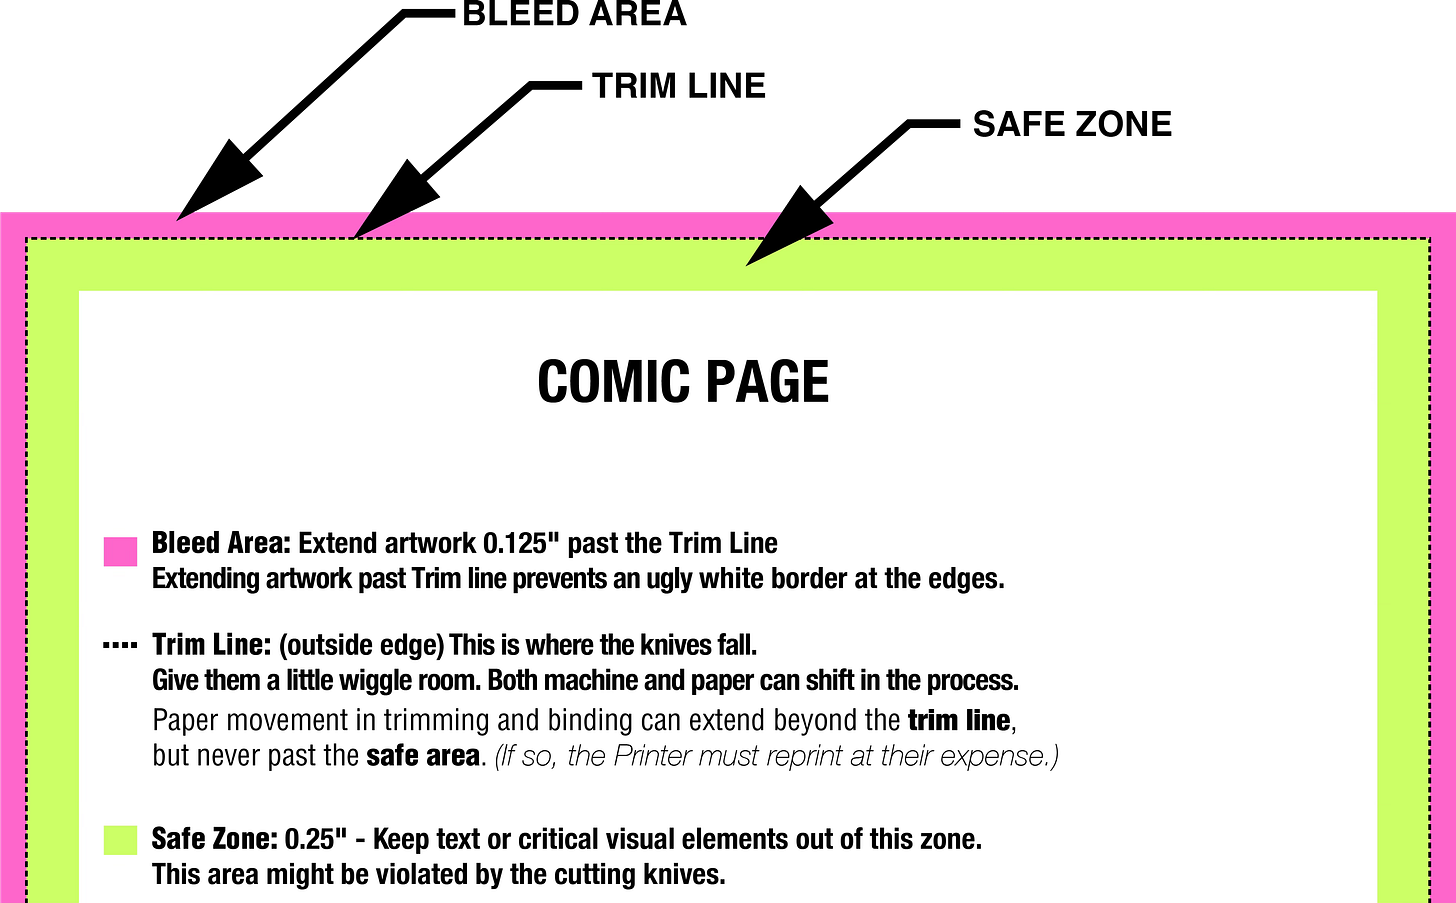
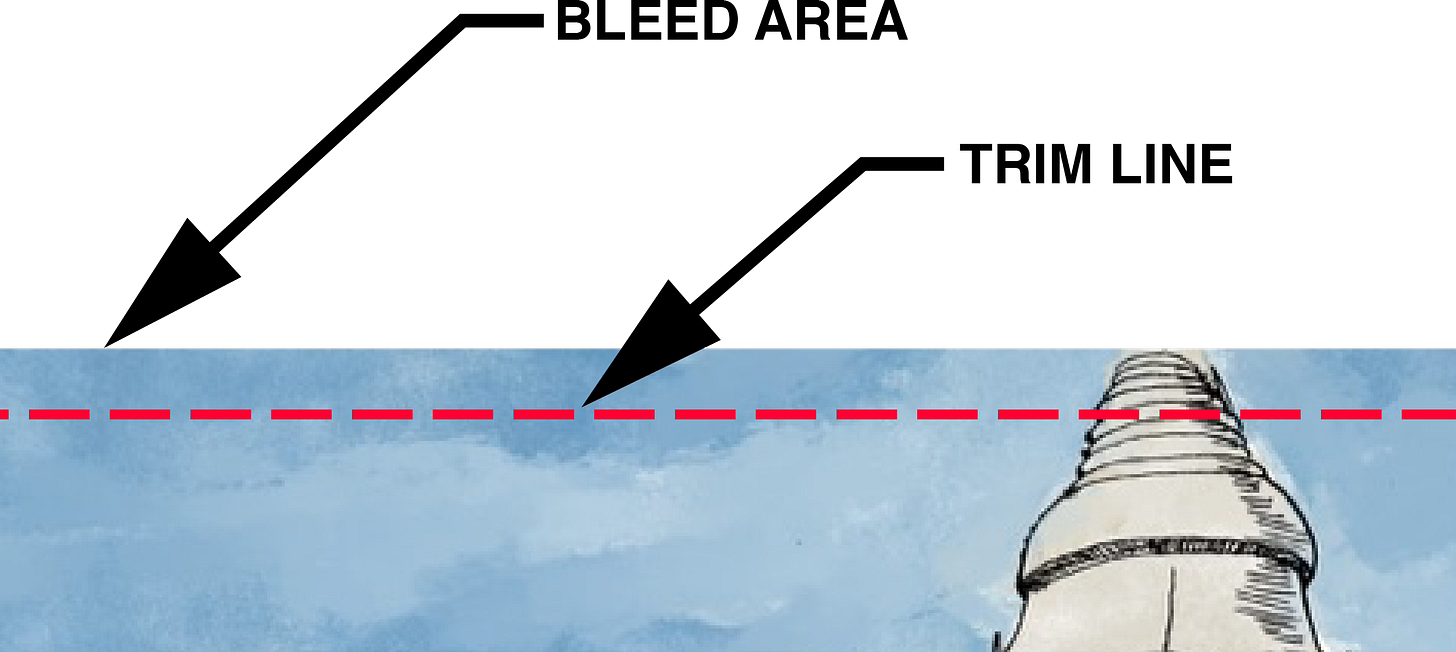
The Bleed is the area that extends beyond the edge of the final printed page. This is where your artwork should spill past the trim line to ensure there are no unwanted slivers of white around the page’s edge after trimming.
• Why is it important?
If your artwork runs to the edge of the page—like backgrounds or full-page panels—you must extend it into the bleed area to prevent white borders or uneven edges.
• How much space does it take up?
On 11" x 17" comic paper, the Bleed is about 1/8 inch (or 0.125 inches) beyond the trim line. Though this part will be cut off, including it in your drawings is essential.
2. Trim Line
• What is it?
The trim line shows where the printed page will be cut. This line represents the final edge of your comic page once trimmed.
• Why is it important?
Anything outside the trim line will be cut off, so you don't want any essential parts of your comic—like key art or dialogue—too close to this line. The trim line is usually marked as a dashed line on your comic paper.
3. Live Area (Safe Zone)
• What is it?
The live area is the safe zone for all your essential content, including characters, dialogue, and key visuals. Anything outside this area could be trimmed or lost in the binding process.
• Why is it important?
The live area acts as a buffer to protect your critical narrative elements. Anything too close to the trim line risks being accidentally cut off, so keeping important content inside the live area prevents those issues.
• How big is the live area?
The 11" x 17" comic paper we use in class and sell in the ASL Store has a trim area of approximately 9" x 13.5", which is usually identified by “live area” and a dotted blue line. It’s sometimes called the “safe zone.” The terms are synonymous, and the printers' big, sharp knives should never come anywhere close to them. Therefore, critical narrative information and dialogue should be kept inside this. In reality, most modern print houses rarely move beyond an eighth of an inch, so if you need to squeek in some extra imagery, you’d probably be ok. But if it’s critical, don’t risk it.
BONUS: Using the Live Area (Safe Zone line) as a Panel Guide
Our class uses the Live area line as a convenient outer boundary for our standard panel borders. This is not a strict rule but rather a helpful shorthand to avoid risking key content getting trimmed.
• Why use the live area as a boundary?
Keeping your panel borders within the live area ensures that your artwork and text remain safely away from the trim line. Since the live area already acts as a protective zone, using it for your panel edges minimizes the chance of accidental trimming during printing.
• When does this rule apply?
This works best for standard comic pages where you want to keep everything tidy and safe from the edges. It's a simple way to design pages without worrying about losing important content.
• Exceptions to the rule:
Of course, this doesn't apply to full-bleed panels or double-page spreads, where the artwork intentionally extends beyond the live area and all the way to your Bleed line. You'll want the artwork to go to the bleed line for those panels. But for your typical panel layouts, the live area makes a convenient boundary.
How to Use 11” x 17” Comic Paper
Now that we know the vocabulary, the terms that matter, let's walk through the process of setting up your comic page:
• Step 1: Identify the Three areas
Look at the non-photo blue lines on your comic page template to find the Bleed, Trim, and Live area. The outermost line is the Bleed, the middle dashed line is the Trim line, and the innermost solid line is the Live area.
• Step 2: Decide on your panel layouts
Plan which panels will go to the edge of the page (full-bleed) and which will stay within the live area. For most panels, we recommend using the live area as the outer boundary of your panel layout. This helps ensure nothing important gets too close to the edge, where it could be trimmed.
• Step 3: Draw in your panel borders
For non-bleed panels, draw the panel borders within the live area boundary. This keeps everything safe from trimming. For full-bleed panels, ensure the artwork extends into the bleed area to fill the page edge-to-edge after cutting.
• Step 4: Plan your word balloons
Word balloons and text must always stay inside the live area. This guarantees they won't be accidentally cut off. Place them early to ensure they don't crowd your artwork and remain safe from the edges.
• Step 5: Draw your artwork (seems weird to put this last)
Once you've drawn your panel borders and placed your word balloons, you can start drawing. FINALLY! Ensure any full-page backgrounds or elements extending beyond panel borders stretch into the bleed area while your primary content remains within the live area. You don’t HAVE to draw your final art last, but knowing where visual elements will land ensures you only draw what is needed and visible.
Closing Notes
By following these guidelines and by using the live area as a convenient boundary for your panels, you can ensure that your comic page is safe from common printing errors. This approach keeps your key content secure and, when combined with full-bleed panels where appropriate, gives your page the polished, professional look it needs. Happy drawing!
It’s the little things that can cause great headaches. Sweat this detail and your comic process won’t have so many hiccups.
Charles Merritt Houghton
14 October 2024
BONUS Cherry-on-Top SECTION:
Common Misunderstandings About Bleed, Trim, and the Live Area
Despite how frequently comic creators use terms like Bleed, Trim, and Live area, they can still confuse—especially for students just starting out. Here are some common misconceptions we see and how to clear them up.
1. WRONG: Trimming the Trim Line Yourself
We encounter misunderstandings when students think they must physically cut the paper along the trim line after finishing their artwork.
• Reality: The trim line is meant for printers, not you. It indicates where the printer will cut the paper during the printing process. Cutting your comic at the trim line isn't necessary and could ruin your work. Just focus on ensuring your artwork extends into the bleed area, and everything essential stays inside the live area.
2. WRONG: Not Extending the Artwork into the Bleed
Some students think stopping their artwork right at the trim line is fine, which can lead to issues later on with white borders or unexpected cuts.
• Reality: The Bleed allows the printer to cut the page cleanly, so your artwork outside standard panel borders should always extend beyond the trim line and to the bleed line. If you don't, you risk having ugly slivers of white along the edges of your page. Always extend page backgrounds and any full-page artwork into the Bleed.
3. WRONG: Placing Word Balloons or Key Art Outside the Live Area (Safe Zone)
Many students think it's OK to place text or important details right up to the trim line, assuming nothing will be cut off during printing.
• Reality: The live area protects your crucial content. Placing word balloons or critical elements outside the live area increases the risk of being cut off or lost in the binding process. Always keep dialogue, essential characters, and major visual elements inside the live area to ensure they print correctly and aren't affected by trimming.
4. WRONG: Confusing the Trim Line with the Live Area (Safe Zone)
Another common mistake is thinking the trim line and the live area are the same thing. Students often assume they can place important artwork right up to the trim line.
• Reality: The trim line shows where the page will be cut, but the live area is the safe zone for all your essential content. Think of the space between the live area and the trim line as a buffer. It's OK to let backgrounds or non-essential elements extend into this space. Still, anything important (like characters’ expressions, dialogue, or critical visual information) should stay well inside the live area.
5. WRONG: Forgetting the Gutters Matter
Some students overlook the importance of gutters and the spaces between panels. They sometimes place essential content in them or don't leave enough space between panels.
• Reality: Gutters are a crucial component of comic semiotics. They denote pages of time and enhance readability. They separate panels and help guide the reader's eye through the page. If you place word balloons, characters, or key details in the gutters, they can become difficult to read or attribute to specific characters or relate to a specific moment. Gutters matter, I can’t say that enough.
6. WRONG: Thinking the Bleed is Optional
There is a misconception that bleed is only necessary for specific designs or that it is an optional area you don't need to worry about unless you're doing something fancy, like full-bleed panels.
• Reality: The bleed area is essential for any artwork that touches the edge of the page. Whether it's a simple background color or a full-page spread, extending your artwork into the bleed area prevents an unwanted sliver of white on the edge of the page. Even if you're not creating full-bleed panels, make sure any significant background elements outside normal panel borders extend into the Bleed to ensure a polished look.
Quick Tips:
• Trim Line: This line is for the printer, not you! Don't cut your pages along it.
• Bleed: If you want the artwork to go to the edge of the page, you must draw into the bleed area to avoid white slivers around the trimmed edge of your page.
• Live Area: Keep everything narratively critical, such as word balloons and characters’ expressions, within the Live Area (Safe Zone).
• Gutters: Maintain clear space between panels to show the passage of time, and for better readability and flow.


